Many of our customers have been fans of the option to use product status flags, “NEW” and “SALE,” which can be added to product grids on the homepage and category pages. But there were requests to extend the functionality to other parts of the Zoey store, which is why we’ve added product status flags to the product and search results pages.
For those of you unfamiliar with how to use Status Flags, today’s blog post will dive deeper into that capability and how to use it on your store.

What Is a Status Flag?
Status Flags are labels connected to products, which until recently were solely a feature of the product grid, that help visually display information about a product. When a product was marked in certain ways as either New or Sale products, and the product grid was set to show a flag, it would show a label that would indicate the product was in that category. These same settings allowed the generation of product grid of New and Sale products for display in locations like the homepage.
Each status flag has a specific way to be configured within products, which would then allow them to be displayed when enabled in the Visual Design Editor.
Configuring a Product
To use the flags, you need to configure a product in a certain way:
- To Use the New Status Flag: Open the product in your product list and add the custom attributes Set Product as New from Date and Set Product as New to Date. Type into the attribute field “New” and select Set Product as New from Date, then choose the date from the calendar in the next field. Remember to Save and click Advanced > Refresh Your Store to ensure your store picks up the changes.
- To Use the Sale Status Flag: Open the product in your product list and go to the Pricing section of the product. Set a Sale price, as well as a Sale Start and Sale End date, to ensure the product will display with a flag. Remember to Save and click Advanced > Refresh Your Store to ensure your store picks up the changes.
Once your products are configured, you can enable flags on your theme.
How To Enable Status Flags
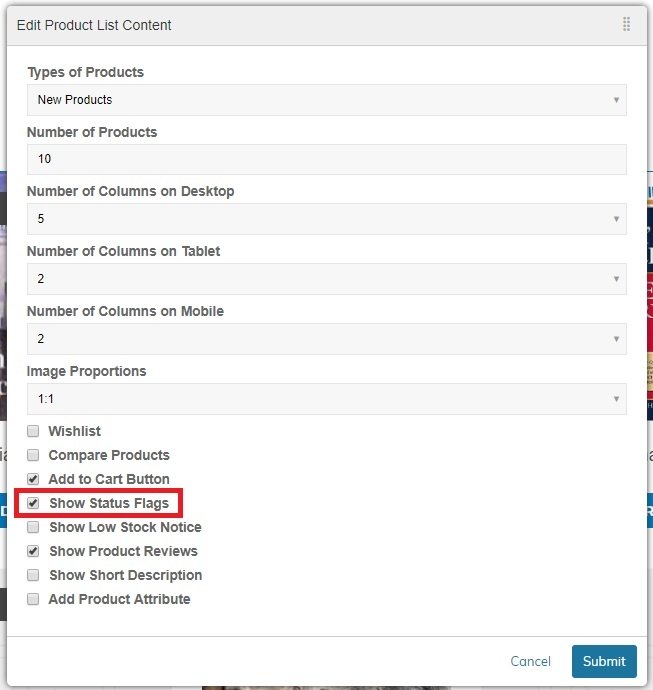
For product grids: Enabling status flags is one setting available in the product list settings of the Visual Design Editor. Enable “Show Status Flags” to see them display on the grid.
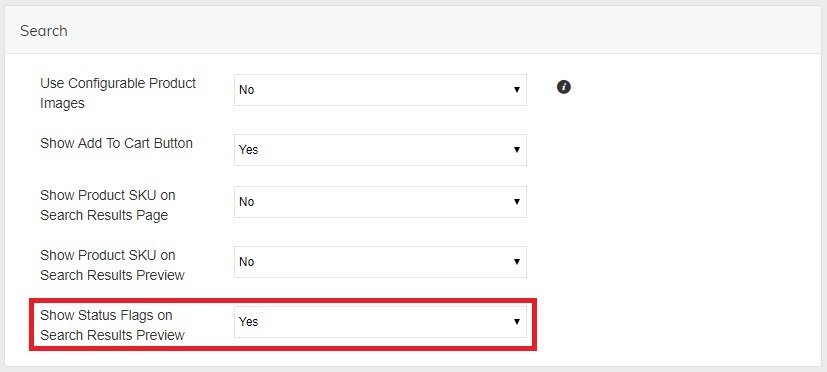
For search results: Under the Products > Settings menu, choose Search. Under the setting “Show Status Flags on Search Results Preview,” select “Yes” and then “Save.”
For product pages: Enter the Visual Design Editor by clicking “Edit My Design” and edit your theme’s product page template. Click on the “Product Gallery” block and select “Edit Product Gallery.”
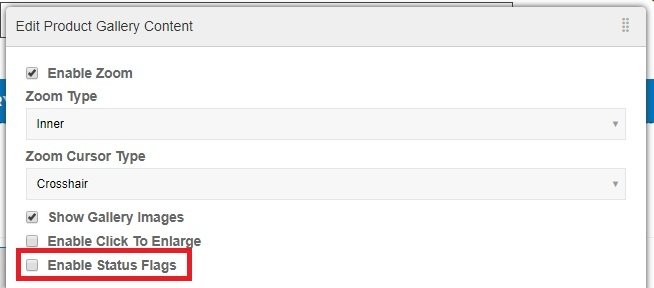
Look for the “Enable Status Flags” setting, check it off, click “Submit” on the modal and click “Save and Publish” to enable the setting on your product page. When enabled, you’ll see a status flag on your product page.
Try It For Yourself
Zoey offers a complete suite of B2B Ecommerce solutions for your buyers and salespeople to order anytime, anywhere. For more information, talk to our team and get your own personalized demo of our solutions: